ClickFunnels and WordPress are both popular platforms that content creators and marketers use. Lots of digital marketers have utilized both programs to improve their business. These two can be integrated fairly easily, so let’s talk about how to do this!
Users can make ClickFunnels in WordPress by using the ClickFunnels WordPress plugin or by going through a subdomain. In either case, users follow a series of steps to join the two platforms. Once the two platforms are merged, users can add funnel pages in WordPress.
In this post, we have prepared a step-by-step guide you can use to incorporate ClickFunnels into WordPress using a plugin and/or a subdomain. We will also demonstrate how to add funnel pages to WordPress. Let’s get into it!
Making ClickFunnels in WordPress
You can install ClickFunnels on your WordPress website using two methods. In the first method, you will use the ClickFunnels plugin.
This plugin is easy to add and will not interfere with other plugins or themes you may have installed.
In the second method, you will make ClickFunnels in WordPress by using a subdomain. Regardless of the method you use, you will need a guide.
To help you out, we will guide you through the step-by-step process below.
Method 1: Creating ClickFunnels in WordPress Using a Plugin
Integrating ClickFunnels into WordPress by using the ClickFunnels plugin is simple.
However, before we start, you should have a WordPress website and account. Here are the steps to follow:
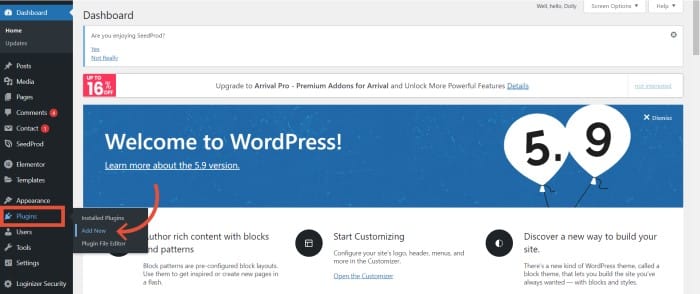
Step 1: Installing ClickFunnels Plugin
1. Go to the plugins section in your WordPress dashboard and click on “add new.”
2. On the search bar, search for the ClickFunnels plugin.
Note that your search will return several ClickFunnels plugins. The official ClickFunnels plugin is the one by Etison.
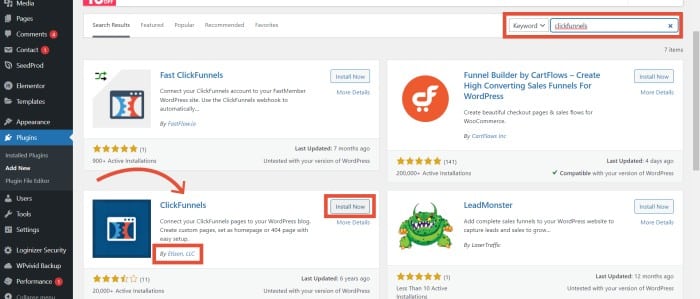
3. Once you find the right plugin, click on the install button beside the ClickFunnels plugin.
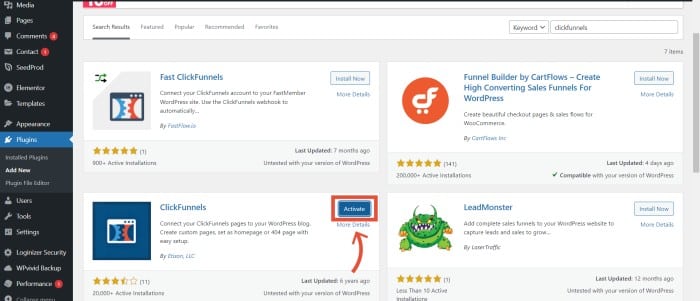
4. Upon completing the installation, click on activate.
Step 2: Enter your API Key
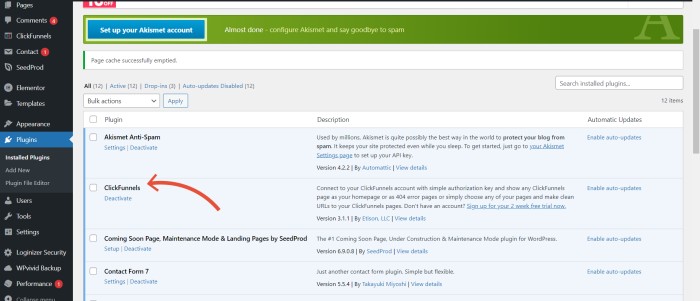
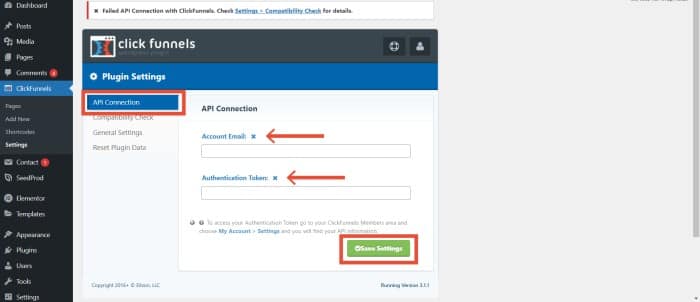
1. After you’ve completed the ClickFunnels plugin installation, head over to the settings menu of the plugin.

2. Here you will need to enter your ClickFunnels email address as well as your authentication token.
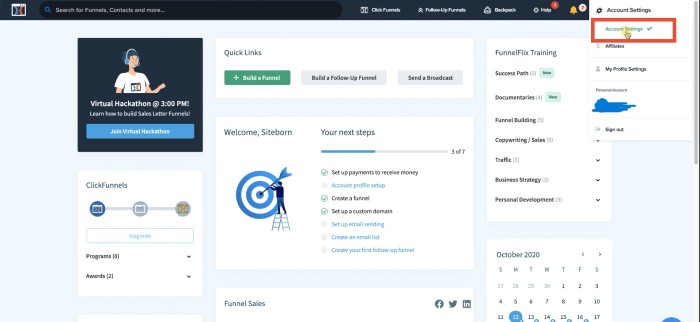
3. Now log into your ClickFunnels account and navigate to the settings section at the top right corner.
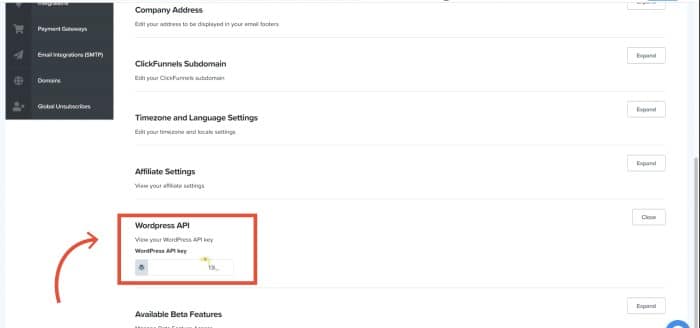
4. Next, scroll down to the WordPress API section and expand the menu. Then you can simply copy the API.
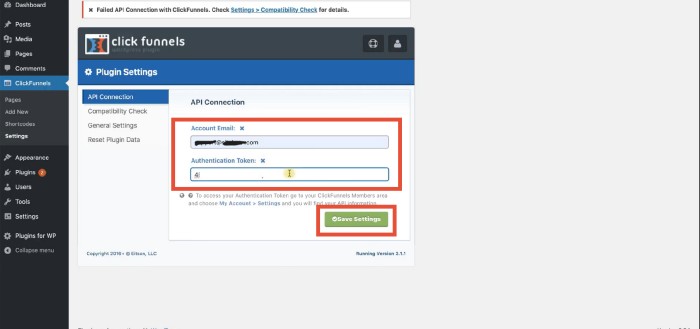
5. Head back to WordPress and paste the API key under the authentication token. Key in your ClickFunnels email as well and save the changes.
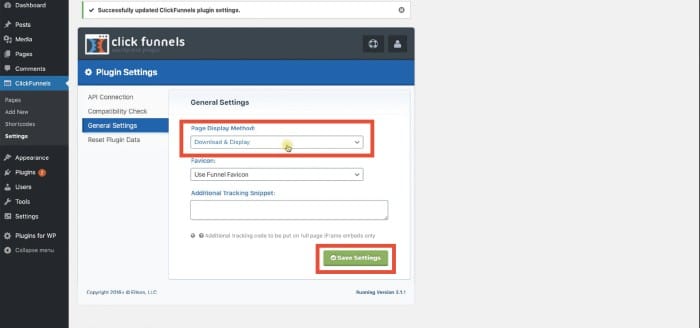
6. Once you have saved the changes, confirm that the changes have been made by clicking on “compatibility check.”
7. Finally, enable the ‘display and download’ option in the general settings, then add the funnel step in ClickFunnels to your WordPress website.
You can add a conventional tracking snippet at this point if you wish to.
And that’s it! You’ve successfully added ClickFunnels to WordPress. The plugin method is pretty simple and straightforward.
Important Note
When creating ClickFunnels in WordPress using the plugin method, do not customize the funnel domain in ClickFunnels.
Maintain the ClickFunnels subdomain for the funnel you make in WordPress.
Additionally, bear in mind that outdated plugins and delayed updates may cause the two platforms to run out of sync.
Secondly, some adblockers may prevent the plugin from working properly.
If you run into these issues, be sure to disable adblockers in your WordPress.
Also, some email symbols such as + and – may hinder the plugin from functioning properly.
That said, the plugin method is the easiest way to incorporate ClickFunnels into WordPress.
Method 2: Making ClickFunnels in WordPress Using a Subdomain
As opposed to the plugin method, this method is more complicated. Still, it’s not too difficult for it to be a dealbreaker even for complete beginners.
Using a subdomain is the more reliable way to incorporate Clickfunnels into WordPress, but it’s also more technical.
It involves creating a subdomain in your hosting account then adding it to ClickFunnels.
Additionally, it needs connection configuration through SSL and DNS. With that in mind, here are the steps you need to follow for this method.
1. Visit your WordPress website hosting account and create a subdomain.
Although the steps for creating a subdomain may differ depending on your host, the key is to find the WordPress DNS.
2. Take into account the TTL, name, target, and CNAME when creating the subdomain.
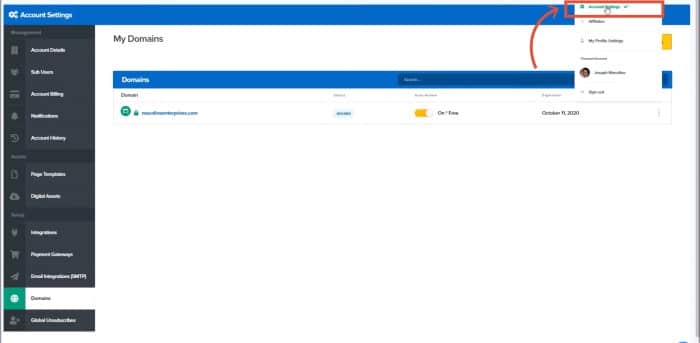
3. Next, you will need to add the created WordPress subdomain to your ClickFunnels account.
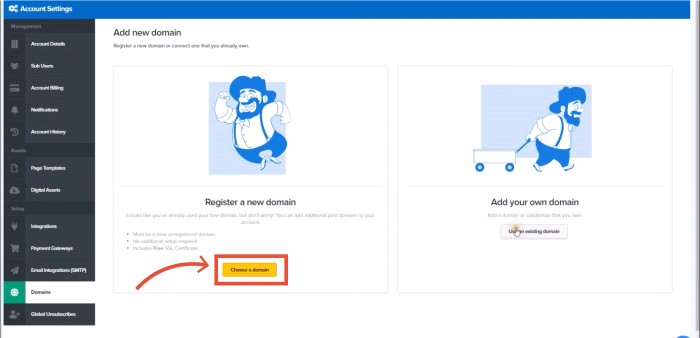
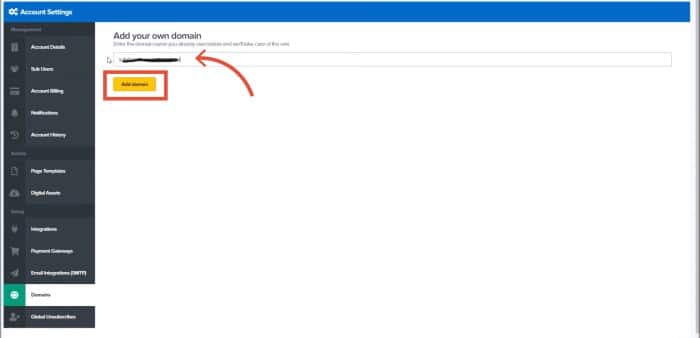
Head over to account settings, select ‘Find domains,’ then click on ‘Add a New Domain,’ and finally, click on ‘Use an Existing Domain.’
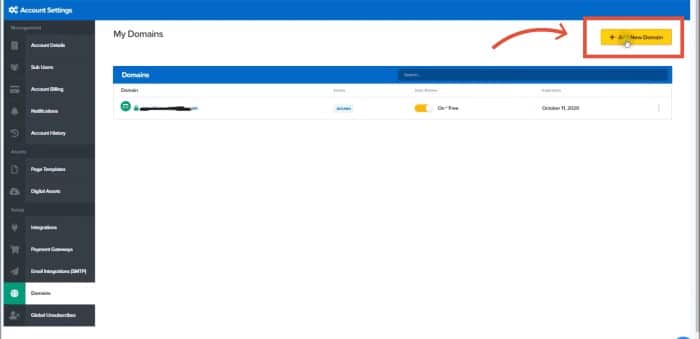
4. In the next blank field, enter the name of your subdomain.
5. Once you have entered the name, click on ‘Add a Domain.’
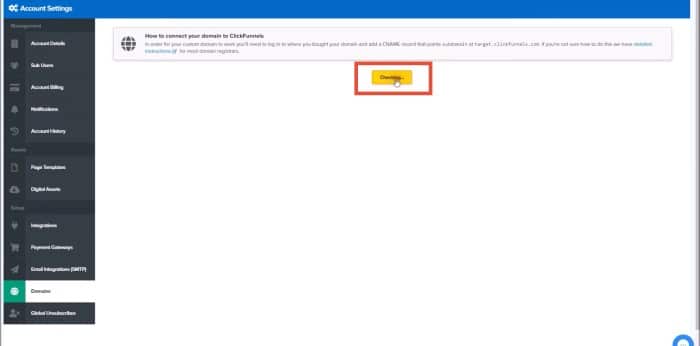
In the next pop-up, you will receive a message that you can ignore if you are already logged onto your host and have the CNAME.
6. Wait for about 30 minutes for the DNS settings to activate. Otherwise, you will receive an error message in your ClickFunnels account.
7. Once the settings are active, log onto your ClickFunnels account, then add and verify your custom domain.
Similarly, verify the SSL on the new subdomain. Click on ‘Expand’ in the SSL section to add the SSL, then click on ‘Add SSL.’
8. Give it a few minutes for the SSL to activate.
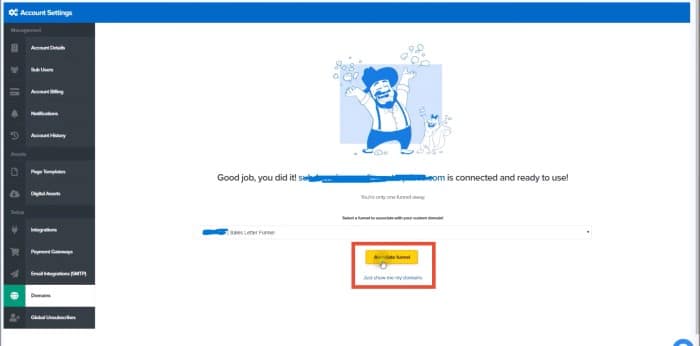
And that is it. If you wish, you could go back and check if you connected ClickFunnels to your WordPress successfully.
Connecting the Elements of ClickFunnels and WordPress
Having successfully created ClickFunnels in WordPress, you can now enjoy more opportunities because you have connected the functions of the two platforms.
By leveraging the offers from both sites, you can also create a better experience for your customers.
This section will discuss how you can add ClickFunnels pages to your WordPress and manage them.
We will also guide you on how to set up a ClickFunnels page as your WordPress homepage.
1. How to Add ClickFunnels Pages to WordPress?
With the ClickFunnels plugin installed and verified, it is time to add ClickFunnel pages and funnel to your WordPress site. Fortunately, it is a simple process.
Here are the steps to follow:
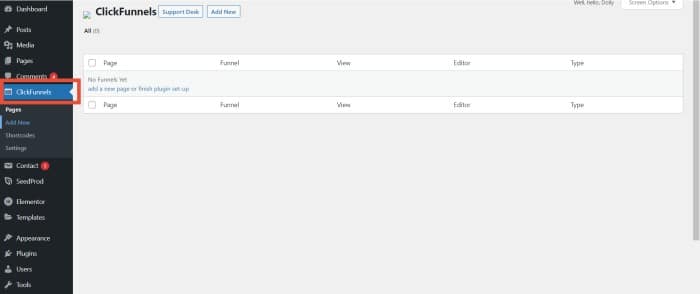
1. On your WordPress dashboard, go to the plugin menu on the left and click on ‘Add New.’

2. Because your account is already connected, go ahead and choose the page type you want. For instance, you can choose a regular page type.

3. Now select the funnel you want to add to WordPress from the drop-down menu.
4. Create your page path by clicking on ‘Assign a Custom Slug.’ The page path will be displayed after your domain name as follows www.domainname.com/slug.
5. Lastly, click on ‘Save Changes’ to update the new page.
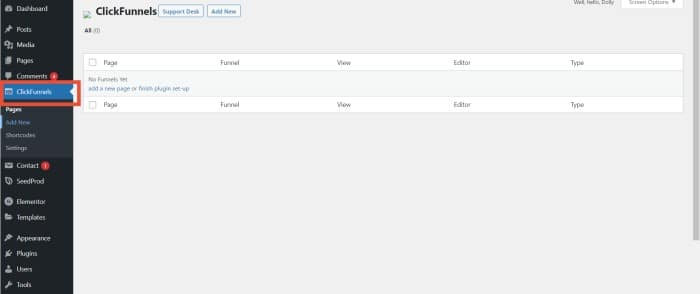
Confirm whether your page was added successfully by clicking on ‘pages.’ Once you click on pages, you should see your new page displayed there.
If you wish to add more pages, repeat the above steps until you add all the pages you need.
2. How to Manage ClickFunnel Pages in WordPress?
Even after you have successfully added your funnel pages to WordPress, there will always be a need for changes.
You will need to edit and organize the funnel pages as your needs shift. Fortunately, you can easily do that in WordPress.
Here is how you can edit or delete a funnel page in WordPress:
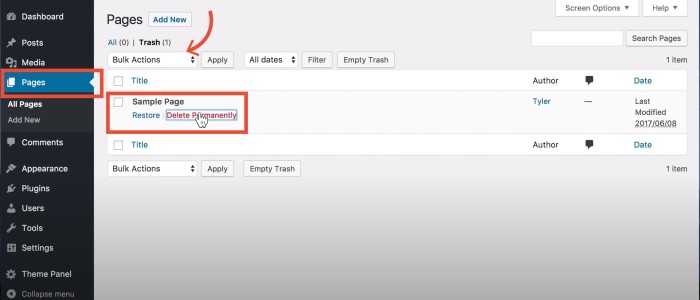
1. From your WordPress dashboard, access the plugins menu and select the ClickFunnels plugin.
2. Select pages.
3. To delete a page, choose the page to delete.
4. From the ‘Bulk Options’, select ‘Move to Trash’ then click Apply. The selected page(s) will be moved to the trash.
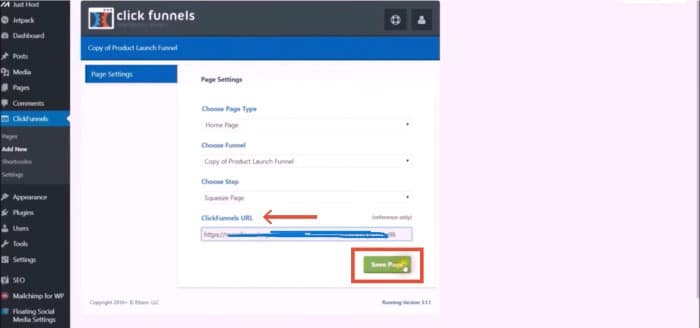
5. To edit a page, select the page you wish to modify.
6. On the next screen, make the necessary changes.
7. Once done, click ‘save page.’
Now that you understand how to add and manage pages, you can set a funnel step as your homepage.
3. How to Set a ClickFunnels Page As a WordPress Home Page?
Setting your ClickFunnels page as your WordPress homepage offers you a lot of versatility.
For starters, you will be able to use the same domain for both platforms and keep your business organized.
In addition, you will be able to enjoy seamless navigation on both sites.
If you have a WordPress domain and wish to set your ClickFunnels page as your WordPress home page, here is how to go about it.
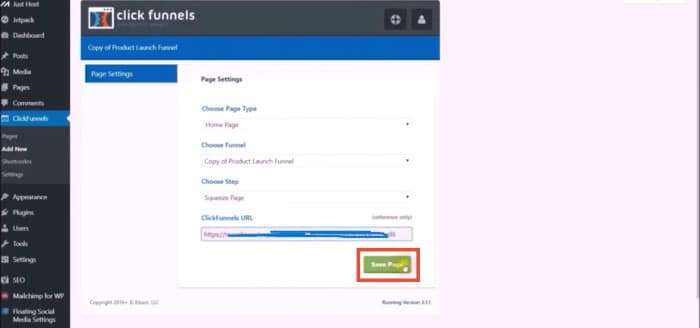
1. In your WordPress dashboard, head over to the ClickFunnels plugin.
2. Click on ‘Add New.’
3. Under the ‘choose page type’ menu, select Home page.
4. Under ‘choose funnel,’ pick the funnel you wish to connect.
5. Choose the desired funnel page from the selected funnel from the’ choose step’ section.
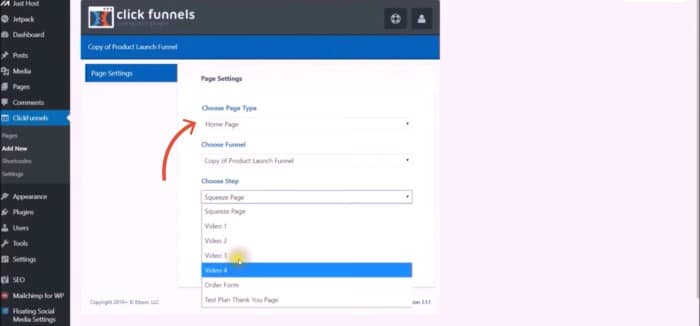
6. Click ‘save’ to save the page.

Testing the Funnel
Once you have added ClickFunnels to your WordPress and added your funnel pages, it is a good idea to test your funnel.
By testing, you can find out if the setup works as desired. And if not, you can make the necessary changes.
Fortunately, testing your funnel is easy and won’t take much time.
Once you have set up and saved your funnel pages, copy the funnel URL and paste it into your browser. Check if it is displaying the intended pages.
If anything is amiss, you can make changes by following the steps we have discussed above.
You can also open an incognito window and view your published pages from an outside perspective.
You’ll be able to tell if anything looks different from the visitor’s point of view. Once you’re happy with the setup, go ahead and share your new funnel URL.
You can now generate traffic, attract leads and turn them into customers.
The Key Reason for Creating ClickFunnels in WordPress
WordPress aims to democratize publishing, ensuring that any nontechnical person can create a website, while building a product that can scale all the way up to enterprise clients with complex needs.
The main reason for adding ClickFunnels to WordPress has to do with the domain.
You see, with WordPress, website owners own the domain, but this is not the case for ClickFunnels.
You have ownership over that domain, plus the freedom to customize it as you see fit.
Creating ClickFunnels in your established WordPress site promotes brand consistency. Your funnel pages will carry similar branding and have a familiar URL.
Therefore, it saves your customers the agony of having to learn another URL.
Although it rarely happens, if ClickFunnels experiences technical difficulties, customers will be left stranded.
By making ClickFunnels in WordPress, your leads are cushioned against potential interruptions.
In addition, WordPress enables you to manage and control the website content in a way that ClickFunnels does not.
There is no disputing that ClickFunnels is an excellent sales funnel creator, but connecting it to WordPress creates a powerhouse for your business.
You can also make ClickFunnels in WordPress to harness the benefits that come from integrating the two platforms. Some of these benefits include:
- Getting the best of both platforms, i.e., a sales-optimized platform and a branded site.
- Ability to use advanced SEO.
- Access to more customization options to meet your needs.
- Ability to offer increased value to customers
Challenges Faced When Connecting ClickFunnels to WordPress
While the process of adding ClickFunnels to WordPress is pretty straightforward, it is not uncommon to run into some issues along the way.
This section will discuss some of the common challenges and how you can overcome them.
1. Delayed Plugin Updates
A delayed ClickFunnel plugin update can stop your integration from working correctly.
You will need to synchronize the plugin with your WordPress updates to mitigate this problem. This way, it will stay up to date.
2. You Cannot Add Certain ClickFunnel Pages
This one can be a challenge or a benefit depending on your goals. So, it is crucial to note that WordPress restricts the addition of certain funnel pages.
These include:
- Order forms
- Affiliate areas
- Affiliate access pages
- Membership areas
- Membership access
WordPress limits the addition of the above funnel pages to enhance customer security. This may benefit customers who are wary of online security issues.
On the other hand, this restriction may be cumbersome if you intend to add the mentioned pages.
For instance, if you thrive on affiliate programs, then you will need another way to run these campaigns/promotions.
3. Failed API Connections
API (Application Programming Interface) is a crucial function for connecting two platforms. It acts as an intermediary between ClickFunnels and WordPress.
If it malfunctions, you won’t be able to merge ClickFunnels and WordPress. Remember the step where we added API Keys?
Well, sometimes, the API may fail to connect due to various reasons such as data malfunction, software changes, and communication breakdown.
Although an API error message is annoying, it isn’t a doomsday message.
You can easily resolve it by using the solutions below:
- Check and update your ClickFunnels software to the latest version. Ensure you have the correct API documentation (from the developer’s site), then download and install updates. Finally, reboot your device.
- Conduct regular formatting and filtering of the incoming and outgoing data to match the API requirements of WordPress.
- Check how your program responds to API failures. Running a test with your ClickFunnels APIs may help to forecast where the problem is.
The ClickFunnels WordPress Plugin is Your Savior
The introduction of top-notch systems like WordPress and ClickFunnels has simplified the building of websites and sales funnels.
You can now use the WordPress ClickFunnels plugin to connect the two systems.
Hence, you can generate and manage content to streamline your funnels, pages, and domains.
Similarly, you can use ClickFunnels with WordPress to develop an online presence and increase traffic, resulting in more sales and profit.
Hopefully, the guide above will help you merge ClickFunnels and WordPress to get the best of both platforms.