So you’ve heard the buzz about ClickFunnels, but you’re not sure how and where to start. As a professional platform for automating marketing strategies, ClickFunnels may seem confusing to use. However, it’s actually fairly easy to set up your account and start creating funnels!
Create your ClickFunnels account by signing up with your details and choosing a free trial or a paid plan. Once you have an account, you can begin creating funnels with templates or from scratch. Integrations and additional user access make the process easy for everyone.
ClickFunnels is a fantastic service for funnel builders, and it offers some unique benefits. We’ll explore how to set up your account, build funnels, add integrations, and much more. ClickFunnels is your one-stop shop for all your marketing needs.
Creating a ClickFunnels Account
Before you can create a funnel in ClickFunnels, you must first create an account. This will grant you access to all the features and customer support you need.
1. Start by signing up for a ClickFunnels account. New users can select a paid plan or subscribe to the 14-day free trial.
You can access the free trial on the website’s main page by clicking on the blue button.
You can also set up an account if another ClickFunnels user sends you a link to their shared funnel.
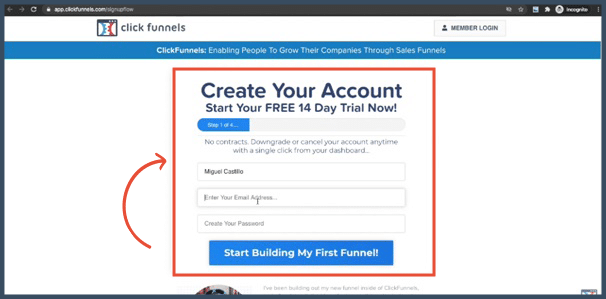
2. Once you have filled out the fields, you can click “Start Building My First Funnel.”
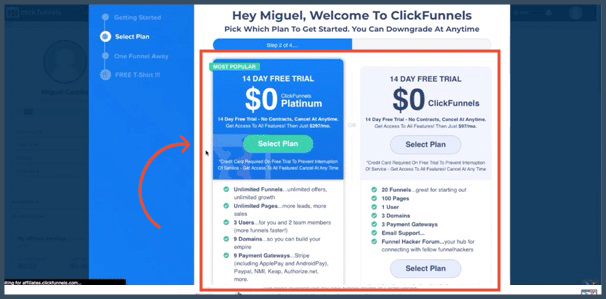
3. If you’re opting for a free trial plan, you can sign up for the Standard or Platinum plan.
Just remember that you can only choose one free-trial plan per registered email address.
The two plans offer different features, so make your choice depending on the requirements of your business.
The ClickFunnels Platinum unlocks more features, so it’s great for people who are exploring Clickfunnels and want to see everything it can do.
On the other hand, if you know your budget will only allow you to buy the Standard plan, you might want to pick this one for your trial.
Using the Standard plan from the beginning will give you an idea of what to expect in the future. You also won’t miss any of the Platinum features once you switch to a full-time plan.
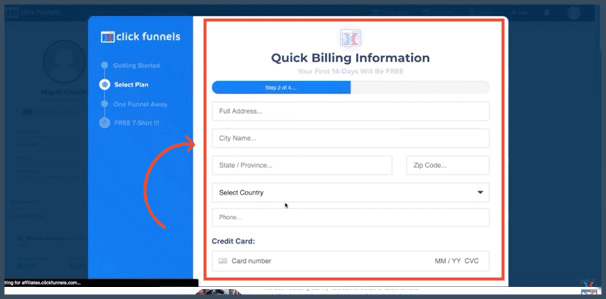
4. After selecting your plan, fill out the billing information in the next step.
5. Once you click “Process My Payment & Information,” you will be taken to another page with a limited-time offer to join a funnel challenge.
Decide if this sounds good or not, then move on.
6. Once you go past this screen, you have successfully created your ClickFunnels account!
If you decide you want to upgrade your subscription, you can do this easily. Simply choose “Account Billing” from the account profile menu.
Once you’re directed to the new page, you can review the list of features for the advanced plan and then select it. Changing your ClickFunnels plan is quick and easy.
Building Your First Funnel With ClickFunnels
Now it’s time to get to the fun part! Building funnels is what ClickFunnels is all about.
The company website offers a list of guides for different types of funnels so that users can better understand the kind of funnel that would be best suited for them.
For instance, ClickFunnels offers lead generation funnels, webinar funnels, and much more.
You can download these guides for free and decide the funnel(s) you want to build for your account.
1. Once you have chosen a funnel type, go to your ClickFunnels dashboard and click “Build New Funnel.”
This will take you to a new page, where you can select “Classic Funnel Builder.”
2. Choose a suitable goal for your funnel according to the needs and requirements of your company.
You will then need to choose a funnel type which includes naming your funnel and creating a tag for it. After this, you can click “Build Funnel.”
3. You can also do all of the above if you select the Funnel Cookbook.
By choosing this option, you will have access to extra steps such as Selecting Industry, Type of Funnel, and Template Suggestion.
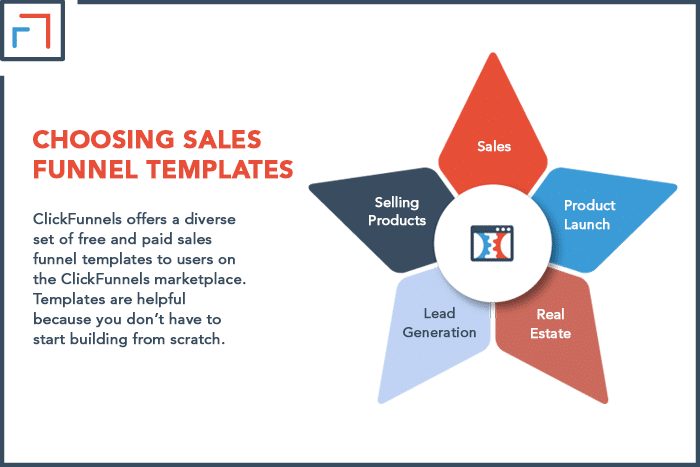
Choosing Sales Funnel Templates
ClickFunnels offers a diverse set of free and paid sales funnel templates to users on the ClickFunnels marketplace.
Templates are helpful because you don’t have to start building from scratch.
The ClickFunnels templates are tried and true, so you have a good base structure to build on and customize.
Some of their most popular templates include:
1. Sales
The Sales Funnel template helps companies design landing pages that focus on increasing conversions.
These pages include limited-time offers, coupons, gifts, discounts, and more.
For instance, Opt-In and Thank You landing pages pull in customers to make a purchase or subscribe to a service.
2. Product Launch
In order to generate traffic and increase sales on launch day, the Product Launch Funnel template allows business owners to build anticipation with its landing pages.
This template includes landing pages with “Coming Soon” videos as well as launch day offers and registration steps.
3. Real Estate
Sales funnels are particularly efficient for generating leads and making sales in the real estate sector.
ClickFunnels has specific Real Estate Sales Funnel templates for real estate agents and companies who want to reel in potential customers.
These templates are targeted in their approach and help mature leads.
4. Lead Generation
If you are generating enough traffic on your website or other landing pages but not making enough sales, you can tackle the problem with squeeze pages.
Squeeze pages are designed to convince visitors to provide their contact details before leaving the page.
Once you have their details, you can add them to your email lists and send them targeted information to build their interest in your product/service.
ClickFunnels has simple yet effective Squeeze Page Templates with only two landing pages. These templates ensure that your visitors turn into subscribers before leaving.
5. Selling Products
With ClickFunnels’ TripWire Funnel Templates, you can maximize your number of product purchases.
This process exposes your customers to exciting offers that are relevant to their purchase history.
This funnel template also involves making upsell or downsell offers as the customer proceeds to the checkout stage.
These offers could be product combos, discounts, free shipping offers above a certain amount, memberships, etc.
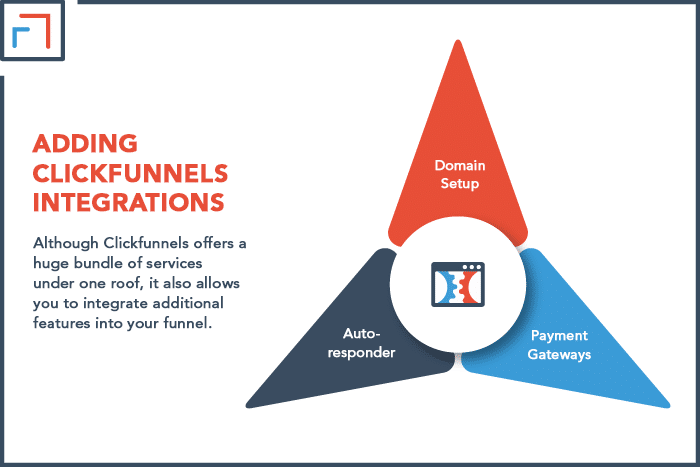
Adding ClickFunnels Integrations
Although Clickfunnels offers a huge bundle of services under one roof, it also allows you to integrate additional features into your funnel.
These third-party integrations make it easier for all kinds of customers to interact with your business.
Some important integrations include:
1. Domain Setup
Choosing a domain is essential to the brand identity of your company. You can connect an existing domain to ClickFunnels, or host the site directly through this platform.
Since ClickFunnels hosts domains, you can purchase one on their website. If you want to do this, head over to your “Account Settings.”
Then from the left panel, choose “Domains” and then “Add New Domain.” You would then have to choose a domain after searching for one on the search bar.
Then, if your desired domain is available, you can buy it! Just click on the price to select the domain and make your way to the payment section.
The domain becomes active an hour after payment.
2. Autoresponder
Autoresponders are valuable features for funnels because they send messages to your customers at specific times.
For instance, if someone abandoned their cart halfway through a purchase, your autoresponder could send them a reminder to return and finish the process.
The Standard ClickFunnels plan doesn’t offer an autoresponder, but there are lots of third-party integrations you can use.
For instance, if you select ConvertKit, go to the autoresponder’s original account, open the settings, and copy the API key.
Then log in to your ClickFunnels account and make your way to “Account Settings.” From here, go to “Integrations” and select “Add Integration.”
Then you can find your autoresponder in the search bar. You can then select it and paste the API key. This will integrate your autoresponder into your ClickFunnels account.
To add an autoresponder to a specific funnel, you can go to your funnel’s page editor and choose “Integrations” from the settings menu.
You can then select the autoresponder you want to connect to the funnel and add it to the list from the “Action” dropdown menu.
You will then need to select an option for “List To Add.” Finally, save the page to launch the changes.
3. Payment Gateways
Creating a way to accept payments is crucial for most funnels. ClickFunnels enables you to use a variety of trustworthy payment gateways.
This wide selection is great for owners and customers alike because not everyone can access every payment gateway. Here are some of the options ClickFunnels supports:
- Paypal
- Stripe
- Authorize.net
- Recurly
- NMI
- Keap
- Easy Pay Direct
To connect to these gateways, go to “Account Settings” and find “Payment Gateways” on the left panel.
This will show you a list of existing integrated payment gateways along with the option to create new ones.
Click on the “+Add New Payment Gateway” to integrate a new one.
Though the Standard Plan only offers three payment gateways, you can increase this limit by upgrading to a Platinum Plan.
Tips for Building an Effective Sales Funnel Through ClickFunnels
- Assess your customer lifetime value (CLV) to understand how much money and effort you’re putting into a customer. Determine if the strategies you’re using are effective in boosting company revenue.
- You can increase CLV by maintaining a consistent and targeted form of communication with existing customers. This can be done using newsletters, promotions, or coupons for customer milestones.
- Avoid bombarding viewers with a ton of information that is not catered to their needs and interests. Understanding your audience is important if you want to ensure that your sales funnel strategies are working.
- Generate traffic based on customer personas for your target audience. Use proper ad placement and relevant collaborations that will interest your consumer base.
- Though customers appreciate discounts and special offers, you need to ensure that these offers add value. Your customers might not be willing to subscribe to your email list if your promotions aren’t useful to them. Think about what the average person would want from your business.
- Testimonials, brand reviews, and reliable statistics add credibility to your brand name. Unpaid advertisements from external blogs and journalists go a long way to boosting your reputation! This kind of press must be earned, though, so take the time to refine your product. Be sure to reach out to customers for their thoughts and feedback.
Customizing Your ClickFunnels Account
The base-level Clickfunnels account will get the job done just fine. However, you can take things a step further and customize it for a better user experience.
If you make the funnel personalized to your brand, it will stand out from other ClickFunnels sites on the web.
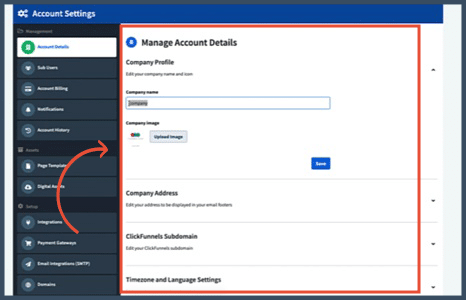
- From your profile menu, go to “Account Settings.”
- Edit your company profile by adding your company name and uploading an image for it.
- You can also edit your company address which would be visible at the end of your emails. Adding contact information will help you establish credibility as well.
- You can also change your ClickFunnels Subdomain as well as the Time and Language settings.
Granting Access to Team Members
Working with ClickFunnels doesn’t have to be a solo gig. Many people can work together to build funnels within this service.
If you want to add your business partner(s), employees, or team members to the same ClickFunnels account, you can provide access to them by adjusting your account permissions.
As the primary user or owner of the ClickFunnels account, you can grant access through the Sub-User Permissions feature.
This is particularly useful when you want to allocate tasks to other people on your team while maintaining administrative control over the account.
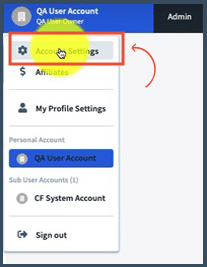
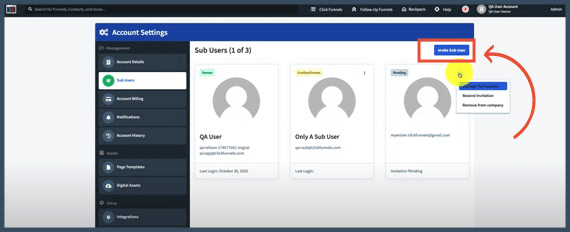
1. Head over to your ClickFunnels dashboard and go to your account menu. Click “Account Settings” and then select the tab for “Sub Users” on the left side of your screen.
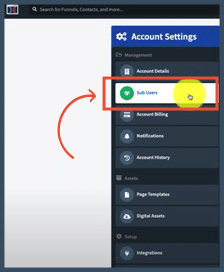
2. On this page, you will be able to view your sub users and add new ones. Add them by clicking the “Invite Sub User” option.
In addition, you can edit permission settings for current sub users individually by clicking the three dots on the side and selecting “Manage Permissions.”
3. You can use the toggle bar to enable or disable granting full access to your sub users.
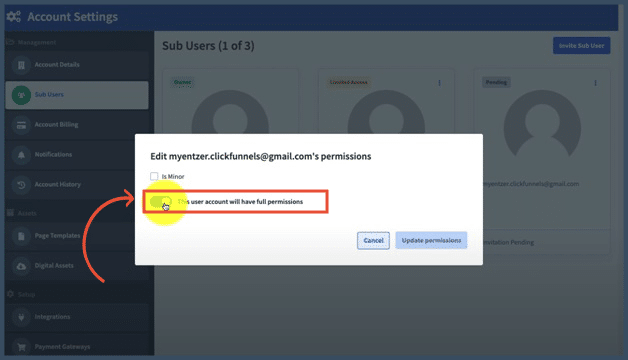
4. An advanced settings menu will appear if you turn off this setting.
This menu allows you to manage all the details and give different levels of access and permission to each sub user.
This comes in handy if you have specific roles for each person.
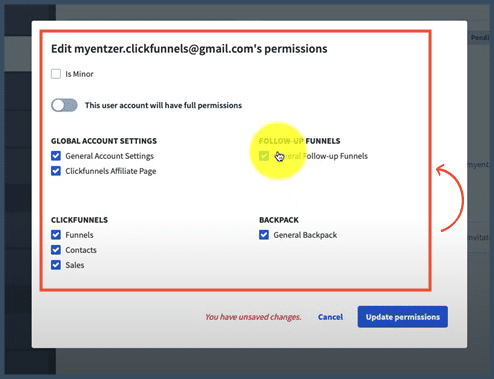
5. Under “Global Account Settings,” you can select two permission features: General Account Settings and ClickFunnels Affiliate Page.
By ticking the first feature, your sub users will be able to handle your account settings, including integrations, domains, and the rest of the settings on the page.
However, this does not include the account billing information, which can only be accessed by the primary user.
6. The “ClickFunnels Affiliate Page” allows sub users to manage affiliate incomes, find affiliate links, and access other affiliate-related features.
7. Similarly, by ticking the “Funnels,” “Contacts,” and “Sales” categories, you will be handing access to the management of these features.
8. Selecting “General Follow-up Funnels” will allow sub users to create, edit and manage Follow-up Funnels as well as email lists and broadcasts.
9. The “Backpack” feature enables the use and access of all of the Backpack affiliate features.
In Summary
Creating funnels through ClickFunnels is quick and easy, but there is a lot to explore within the platform.
Creating the account isn’t just limited to signing up with your details and selecting a plan.
Users have countless opportunities to add integrations, customize funnel templates, and add partners/employees to each funnel.
To make efficient use of the platform, you will want to set up a few custom settings according to your needs.
ClickFunnels also provides extensive help and support to users who need help getting started with their first funnel.
This service is truly impressive, and it offers a ton of features and benefits under one roof. So if you need an all-in-one funnel builder, ClickFunnels is for you.