Blogging is a great way to build brand credibility, grow your audience, share information, and eventually monetize your site. However, blogging is a long-term strategy that may not give immediate results. Luckily, using ClickFunnels as a blogger can help you speed up the monetization process.
ClickFunnels enables you to create a blog with the ClickFunnels service or connect an existing one. Blogging in ClickFunnels merges sales funnels and your blog, giving you access to ClickFunnels’ templates and features. With these, you can capture more leads and boost your sales.
In this post, we will discuss how to create a blog in ClickFunnels, why you should consider doing this, and some of the features and templates that you might find helpful. You may not think to use ClickFunnels as a blogger, but it can help you out a lot!
ClickFunnels vs. Blogs: What Distinguishes Them?
To get a clearer understanding of ClickFunnels for bloggers, it is important to take a quick look at what things they can do individually.
To start with, ClickFunnels is a funnel-building software aimed at creating funnels that generate leads and boost sales for businesses.
Additionally, these sales funnels provide guided steps that direct leads along the purchase path.
They are broad marketing tools that are used to connect with people and share targeted content.
On the other hand, a blog is an informational or personal web page that is often filled with broad (but valuable) content.
Blogs are often used as part of a marketing strategy, and they thrive on SEO tactics and consistency.
Unlike funnels, blogs tend to produce long-term results rather than immediate ones.
Blogs convert visitors into customers by providing valuable information and building relationships.
To create a blog, most bloggers use WordPress software because it is full of tools needed to create and publish content for search engines.
Among these tools are themes and plugins. On the other hand, ClickFunnels usually relies on its templates and integrations to run sales funnels.
Can You Build a Blog on ClickFunnels?
Although ClickFunnels is primarily a sales funnel builder, you can build a blog on it. This can be a worthwhile option if you already have a ClickFunnels account and you do not wish to invest in another software just for blogging.
Building a blog on ClickFunnels will enable you to create funnels on your blog and direct your readers to take action.
In addition to creating a blog on the ClickFunnels platform, you can choose to integrate an existing blog into ClickFunnels.
Either way, before considering using ClickFunnels for blogging, here are a few limitations you need to keep in mind:
1. Lack Of RSS Feed
The ClickFunnels platform lacks the RSS feed available in WordPress.
As a result, you cannot have one post page in ClickFunnels where you can add all your content.
This means you will have to manually figure out how many categories and menus you need.
2. Limited SEO Capabilities
ClickFunnels’ SEO capabilities are limited since it wasn’t designed for blogging.
For instance, WordPress has plugins like Yoast that help you write readable and optimized content.
However, that is not the case with ClickFunnels. As such, you need to figure out the word count, keyword density, and meta description by yourself.
3. The Sitemap Headache
ClickFunnels does not support the creation of sitemaps which are a crucial submission to the Google Search Console.
Subsequently, you will have to create a sitemap manually, add the appropriate URLs, then submit it.
Alternatively, you could use a sitemap maker tool (such as XML sitemaps).
4. Increased Complexity
You will need to create multiple funnels to create a blog. For instance, you need different funnels for the home page, blog page, and blog posts.
Once this is done, you will need to connect them manually. This isn’t the case with WordPress, where you only need pages and posts.
How to Create a Blog on ClickFunnels?
To create a blog on ClickFunnels, you will need to create three funnels separately and then combine them. Here are steps to follow for each funnel.
1. Creating the Homepage Funnel
This page will act as the homepage from which your blog visitors can view and navigate to the rest of your blog.
Without this, your blog posts will be difficult or impossible to find!
Step 1: Go to your ClickFunnels dashboard and click on the green button that’s labeled ‘Build a Funnel.’
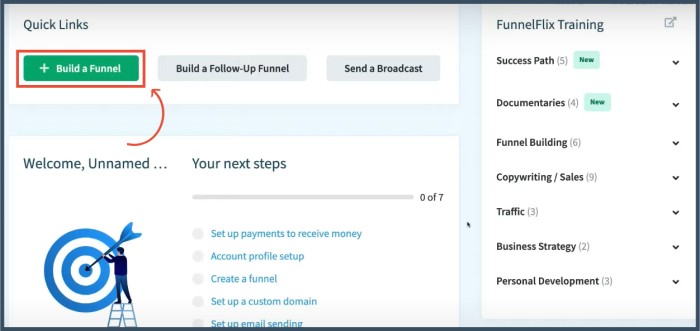
Step 2: On the left, you should see a section called ‘Funnel Type’.
Once you locate it, check the ‘Generate Leads’ box to select an appropriate template for this funnel.
If you’re unsure about what to choose, the Homepage Funnel Template is an excellent place to start.
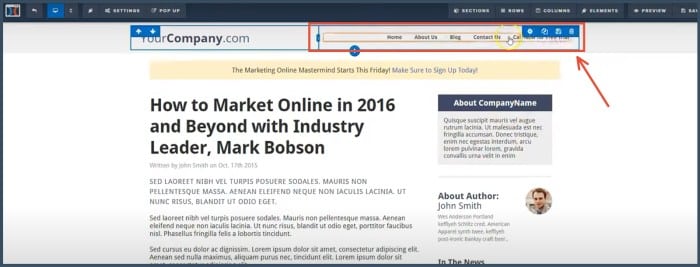
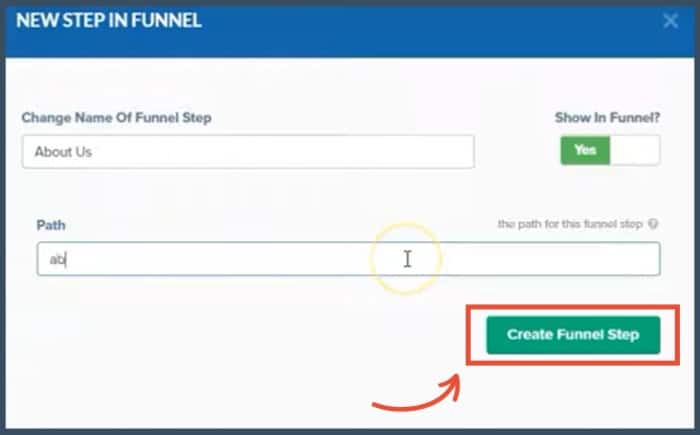
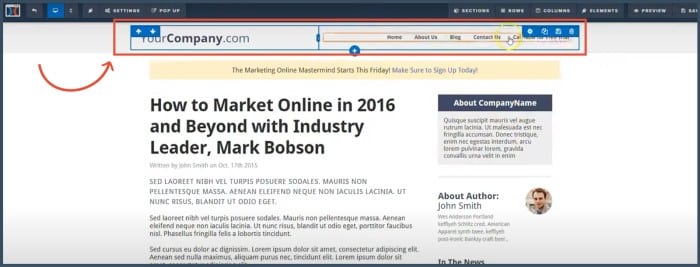
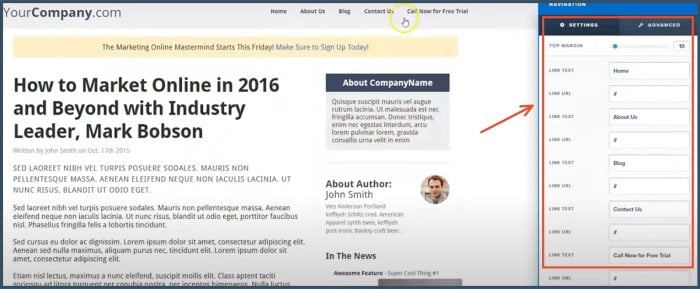
Step 3: Select ‘Edit Page’ after highlighting the homepage step. Next, you should enter the header menu to access all the settings.
Step 4: Fill in your preferred menu fields. This might include fields like Home, About, Blog, and Contact.
Step 5: After editing the header, save your changes by clicking on the ‘Save’ button. You can find this in the top right corner.
You can also use these steps to edit the footer as well. Just make sure you save your changes again once you’re happy with how everything looks.
Step 6: You will now see your About, Blog, and Contact pages under your funnel steps.
Once you’ve followed the steps above, you may edit each page as desired, save the changes and return to the dashboard.
2. Creating Your Posts Page
The posts page will host all your blog posts. This is an essential page because you need a place to create and update all of your blog posts.
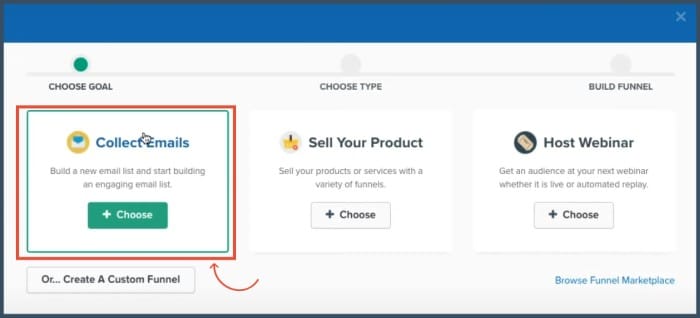
Step 1: In the ClickFunnels dashboard, click on ‘Build Funnel.’ At this point, you’ll need to choose a goal for this funnel.
A good one for a blog is the ‘Collect Emails’ goal. Once this has been selected, name the funnel something like ‘Posts’ or ‘Post Page.’
Step 2: Pick a couple of templates for the different parts of this funnel.
You won’t use all of these and can remove them later, but it’s necessary to add them when you build the skeleton of a funnel.
A good template might be the Opt-in Blank Start, but you can pick pretty much anything for the Thank You page (since you won’t be using it anyway).
Step 3: Once done, click on ‘Publishing’ and name your funnel under the funnel step name section. Then you can just click on the ‘Update Funnel’ step.
Step 4: Now delete the Thank You page by highlighting it and clicking on the ‘Delete Funnel’ step at the bottom.
Once this unnecessary piece has been removed, highlight the remaining page and click on the ‘Edit’ page.
Step 5: Hover over the default row on the template and delete it. Next, click on ‘Add Rows from Rows.’
After that, go to ‘My Rows’ and select your preferred header template. Now all you need to do is drag and drop it onto the page.
Repeat the same process for the footer.
Step 6: To add a navigation menu for the previous or next post, include a full-width section in the space between the header and footer.
Keep this section blank though. Underneath this section, add a single column row followed by a two-column row under it.
Step 7: Once all this is done, add buttons to the rows, save your work, and exit the funnel.
3. Blog Post
Now it’s time to get to the meat of the matter: The blog posts.
Keep in mind that if you plan on writing posts with different categories, you will need to create multiple funnels and assign each category to its own funnel.
As such, ensure you choose an appropriate ClickFunnels plan so you don’t run into limitations regarding how many funnels you can create.
Step 1: Start a brand new funnel and give it an appropriate name for one of your categories.
You’ll need to do this multiple times if you have a variety of categories to write about.
Step 2: Locate the Blog Post Style template under the MISC menu. This one is ideal for the purpose of blogging.
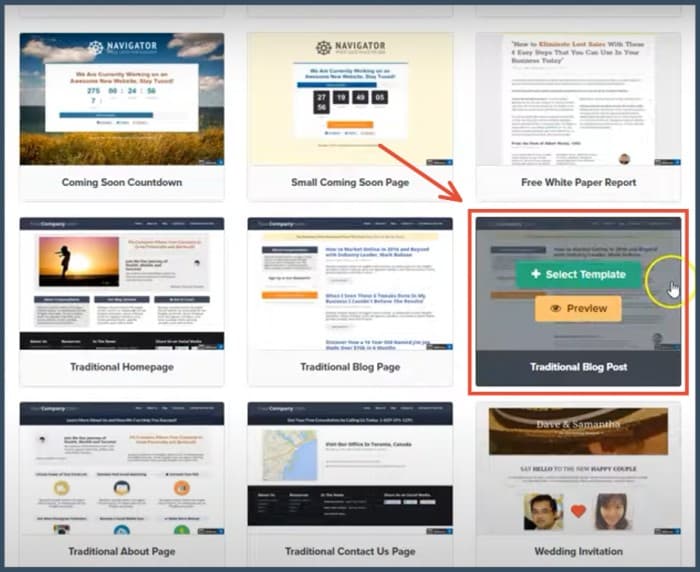
Step 3: Edit the template by replacing the current header and footer with your own content and information.
Make sure it matches the rest of your style as much as possible, so the site has a uniform appearance.
Step 4: At this point, you can get creative and design the page by adding and removing elements until you achieve your desired appearance.
Once this is done, save this page as a separate template.
This will save you a lot of work because you can use this new template for all your categories/posts in the future.
Step 5: To save the page as a template, go to the settings and click on ‘General.’ Once there, you will see the option to save the page as a template.
4. Linking Everything Together
After creating all the blog pages, you need to link them. To make your work easier, you should copy all the URLs and paste them into one document.
Then, open each page at a time and add the relevant URL to the menu.
You’ll need to repeat this process for all the menus because ClickFunnels does not cross-reference menus automatically.
Although the process will take time, it is crucial to help you avoid errors. Once it’s all done, keep testing until all the links start working as intended.
That’s it! You have now successfully created your blog in ClickFunnels. It may seem a bit complex, but it’s fairly easy to work with once everything has been set up.
How to Integrate ClickFunnels With Your Existing Blog?
Now that you know how to create a blog on ClickFunnels, you may be wondering what to do if you already have an existing blog.
Many people start blogs before they get into ClickFunnels, and it’s natural to want to connect your sites.
If this is the case, you have already done most of the work, and all you need to do is integrate your blog into ClickFunnels.
The best part is that merging ClickFunnels and your WordPress blog is simple. You just need to install the ClickFunnels WordPress plugin in your WordPress dashboard.
Once installed, verify the plugin settings to ensure the two platforms are compatible. With these few steps, you can start enjoying blogging with ClickFunnels.
Merging ClickFunnels with your blog will save you the trouble of moving all your content to ClickFunnels.
You risk messing up your formatting and style if you do this.
In addition, it’s usually the best way to use ClickFunnels as a blogger since you will get the benefits of both platforms.
One such benefit is that you will get more traffic and boost your revenue because you will retain all your previous readers.
Blogs also rely on SEO to obtain traffic, while sales funnels get traffic from paid advertising.
Combining these two will increase your traffic, which leads to more visitors and higher revenue potential.
ClickFunnels Features That Support Blogging
ClickFunnels has tons of fantastic features. Most of them are not explicitly designed for blogging, but they can be used to support and enhance the process.
A few useful features for bloggers include:
1. Follow Up Funnels
Follow-up funnels allow you to automate your emails for all your pages and funnel.
Therefore, when you build your blog in ClickFunnels, you will be able to automate your homepage, post page, and all your posts.
This means each lead will receive personalized emails and get access to different lead magnets depending on where they are on your blog.
However, to access this handy feature, you need to subscribe to the ClickFunnels Platinum Plan since follow-up funnels are not supported by the basic plan.
2. Membership Pages
This feature allows you to create membership sites that are exclusive to a certain percentage of your followers.
As a blogger, you can use this feature to generate membership pages where you can publish your exclusive content.
Then you can then ask your blog visitors to log in to access the content.
Better yet, you can monetize your membership pages by charging members to access the exclusive content through a sales funnel.
Alternatively, you can also create a member-exclusive product.
3. Sales Funnel Pages
The core function of ClickFunnels is to create sales funnels that convert visitors into paying customers.
You can leverage this functionality to turn blog posts into sales funnels by using opt-in forms, buttons, timers, and more.
By turning blog posts into sales funnels, you will capture more leads and, in turn, boost your success as a blogger.
Tips for a Successful ClickFunnels Blog
The primary goal of blogging with ClickFunnels is to build your brand while generating more leads and boosting revenue faster.
To achieve this, you need to ensure you create the right pages and create engaging content that addresses your readers’ pain points.
The ClickFunnels pages you should have on your blog include:
- A sales page that showcases your product or service.
- An order page to collect payment details securely.
- A squeeze page for collecting the details of your blog visitors.
- A thank you page for appreciating your customers for their choice to purchase or sign-up.
Once you have crafted your sales funnel pages, you need to infuse them into your blog with creativity.
This is important so you can avoid disruptions to your visitor’s reading experience.
For example, you might set the squeeze page as a banner at the end of a post or as a pop-up once a reader has been on the page for a while.
In addition to strategically placing the sales funnel in your blog, you need to offer engaging and high-quality content.
Ensure the content addresses your target audience’s pain points so you can keep them coming back for solutions.
Wrapping Up
There are two ways to blog with ClickFunnels. You can either connect your existing blog to ClickFunnels or create a new blogging funnel within ClickFunnels.
Whichever option you use, you will be able to boost your traffic, generate more leads and increase your visibility.
If you already have a WordPress blog, use the ClickFunnels WordPress plugin to link the two platforms.
If you wish to create a blog in ClickFunnels, you must make at least three funnels as outlined above.
Create each funnel separately, then link them at the end to start a blog.